
Welcome!
Today, we'll be drawing another face.
Materials Necessary for this Drawing:
Pencils
HB
2B
4B
6B
Drawing Paper
Eraser
Kneaded Eraser
Pencil Sharpener
Tortillion, or tissue
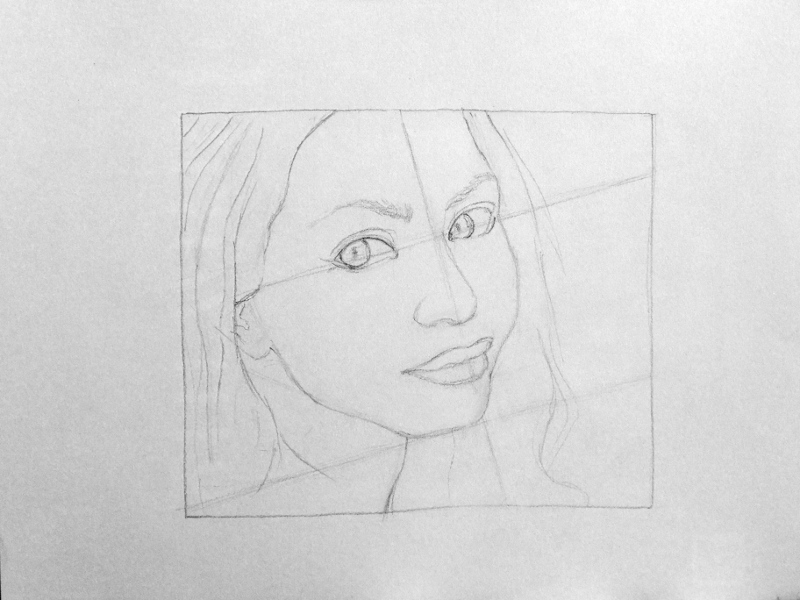
Step 1

We start with the outline. I have drawn a rectangle around the drawing to suggest the format.
To gauge whether or not you have the correct proportions, draw a grid first as shown in the above illustration. Make horizontal lines over the eyes, nose, and mouth, and make sure you have the proper angle. From our viewpoint, the woman's face is cocked to the left side (which is her right side). So the right eye (our perspective) is positioned lower than the left eye.
A slanting vertical line is made from the top of the format through and over the woman's nose. One side of her is more visible than the other, so the position of the nose is adjusted accordingly; which more to the right of the drawing.
Take note that the light source is from the top right-hand side, so the shadows of the face will be cast to the left.
Remember to draw the outline lightly, try not to "bear down" on the pencil.
Step 2
In Step 2, layout all the features; eyes, nose, and mouth. Don't add too many details, just the outline.
Pencil the basic shape of the hair, and draw lines to suggest the direction of the hair's flow.
Step 3

Add an overall even shade of light gray to the entire face with the HB pencil. As I have explained in past tutorials,you should always remember that nothing is ever completely the white of the paper with no graphite on it. There are lighter areas, but most every subject we encounter in our drawing has to a certain or lesser degree different tonal patterns of gray.
No need to blend in this application of gray at this step.
Step 4

At Step 4, we begin adding the shadow tones. Using the 2B pencil, add the graphite as evenly as possible, that way it will blend more smooth with the tortillion or tissue.
Here is a zoomed image of Step 4:

Add some dark strokes to the hair, but don't do too much; we'll get to that in later steps.
Step 5

In Step 5, blend the graphite of the face with the tortillion. Go easy; don't press too hard with the tortillion. Try to blend the shadows slowly, working from the deepest shadows outward. It helps to blend everything with your finger first. Be careful with the tortillion, it blends extra dark. It is far easier to add darker tones than to remove them.
Give the hair some more penciling--don't try to finish it, but define it more by its value patterns. Look to see where it's the darkest, and add graphite there. Don't go about it as attempting to draw every strand. Fill in the tones by seeing the hair as groups of varying tonal patterns of dark and light.
Step 6

Now, we pencil in the woman's eyelashes. Use the 2B or the 4B pencil. Notice that they aren't straight up, but rather curve upward, much like a comma stroke. Try not to add too many lashes, and be careful of making them too long.
On the left side in the hair, the woman is wearing a braid. Make a pattern of criss-cross strokes to use as a guide for Step 8, where we will be drawing the braid.
Add some more pencil to the dark areas, using the 2B pencil. Afterward, blend the shading using the tortillion or tissue.
Step 7

In Step 7, we add more dark tones to the hair, using the 4B and 6B pencils. Notice that the drawing is a little flat; this is because we need to add the highlights. We will do this next in the final step.
Add an even layer of the dark tone to the hair.
Step 8

For the final step, we add the finishing touches; for the braid, add dark shade where the weave of the braid recedes into the strand which follows it, and leave a lighter area at the top of each braid, as shown in the illustration above.
With the HB pencil, add some more shade to the darker areas of the woman's face, and blend it evenly.
For the highlights, I used a Derwent battery-powered eraser. This is an extremely useful tool to have and I recommend it highly. If you don't have one, no problem, you can use a click eraser or a pencil eraser.
With the eraser, add highlights to the hair and lips, as shown in the illustration above. Notice that the light source is coming from the top-right side. The lips are lighter on the right side, and get gradually darker as you move to the left.
For the highlights on the braid, erase the top part of each braid, slightly.
For the skin highlights, use a kneaded eraser. The highlights are the right side of the bridge of the nose, including the nose tip, the cheekbones, and the neck. If you erase too much, just go over it lightly with the HB pencil.
We're finished!
Comments
Post a Comment