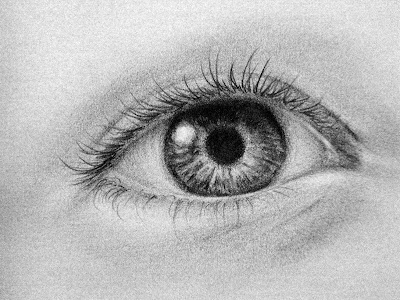
For the first tutorial, we will draw an eye. Arguably, drawing eyes and other facial features can be difficult. Hopefully, this step-by-step instruction will simplify the process.
We will be using three pencils for this drawing: 2B, 3B, and 6B. These refer to specific grades of softness of the pencil. The rule is, the softer the graphite, the darker it will go on the paper. Thus, 6B, will lay out a nice, thick, black, ideal for deep shadowing. It is good advice to always keep your pencils sharpened. Also, a kneaded eraser will be useful.
STEP 1
First, we draw the basic outline and shape of the eye using the 2B pencil. It is not necessary to add fine details at this stage. Use care to not use firm, hard strokes--instead sketch the lines with a feathery, light touch. Otherwise, if you use hard strokes and lines, you will create indentations in the paper, which is counter-productive later on when we add the shadowing and other details.
Be sure to scale your outline at least two inches wide. To assist in getting the proper scale, use a ruler and mark two inches on the paper, and draw the outline within these parameters.
STEP 2
With the 6B pencil, fill in the pupil, keeping in mind to not use hard strokes, but rather a firm circular motion. The 6B is plenty dark, there is no need to overdo it!
STEP 3
For this step, take the 4B pencil and a separate piece of scrap paper and draw some dark strokes on it. Then, using either your finger or tissue paper (or even better, a commercial blending stump), rub the dark area of the scrap paper so that the material (finger, tissue or blender) is saturated with graphite.
Focusing on the iris of the eye, rub the graphite lightly with a circular motion within the iris, as shown above. Pay close attention to not rub graphite into the highlight of the eye located to the upper left of the pupil. This small white area represents the reflected light of the eye. If you accidentally do get graphite into this area, it is easily removed with a kneaded eraser.
For the area immediately outside and surrounding the pupil, this part is slightly lighter, so apply graphite only sparingly.
STEP 4
Moving on to the next step, take the 2B pencil and draw strokes going outward to the edge of the iris beginning at the lighter area of the iris, as shown above. Make light, thin lines, and be gentle. These strokes will represent the "lines" which appear in an actual iris. As we shall see in a later step, this will prove to be the preliminary step in which the kneaded eraser will be utilized to highlight the iris, bringing the eye to life.
The area under the upper eyelid, using the 6B pencil, add a graded shadow,with the area immediately under the eyelid the darkest and working lighter as it comes toward the pupil.
STEP 5
Add darker shadows, using both the 4B and 6B pencils. Around the edge of the iris and working inward use the 4B to add a graded shading to give the appearance of an orb. Otherwise, if there is only a line to indicate the edge of the iris, the eye overall will look completely lifeless.
STEP 6
With this step, we fill in the final details. Add the eyelashes to the upper and bottom eyelids, making quick, sure comma strokes, as shown above. Pay particular attention to the direction of the eyelashes as the follow the lid to both corners of the eye. Note that as the lashes proceed, they gradually flare outward.
Be sure to make the starting point of the eyelashes on the outer line; this gives the appearance of three-dimensionality as it looks like an eyelid. give this area between the eye and eyelashes a light shading with a 2B pencil.
For the iris, take the kneaded eraser and squish it making an edge, and erase highlight strokes along the lines in the iris made in the previous step. Don't overdo it, just erase enough to give some highlights.
Give a graded shadowing around the white of the eye with the 4B pencil, noting that it is slightly darker around the edges. Also, give shading to the iris area which meets the eyeball. All this will give the eye a lifelike roundness.
The shading around the eye can be achieved using the method performed in Step 3; using a 4B pencil, scribble on a scrap piece of paper to get a liberal amount of graphite on the surface then rub a finger into it, then apply and blend it around the eye, as shown above.
I welcome any comments, and I am happy to answer questions!


Thanks a lot for the tutorial, it helps a lot
ReplyDeleteNice work
ReplyDelete