
In the next tutorial, we will draw a female mouth from the frontal perspective. This viewpoint is the simplest to draw.
We will be using the range of pencils: HB, 2B, 4B and 6B for this exercise.
STEP 1

In this step, sketch the basic outline using a 2B pencil. The area should be around three inches from the left to right sides of the mouth, and two inches from the top to bottom. Use a ruler to get the proper measurements, but this size is suggested only. You can draw the mouth bigger than this, but try to keep at or above these measurements, because in later steps we will need a sufficient area to work in to add details and final shading.
On thing to remember: if you are just starting out and learning to draw, don't worry about getting this outline exactly right, and don't worry if you leave out a few teeth. Just try to do the best you can. Optionally, you can print the Step 1 image and trace it to the surface to be drawn.
STEP 2
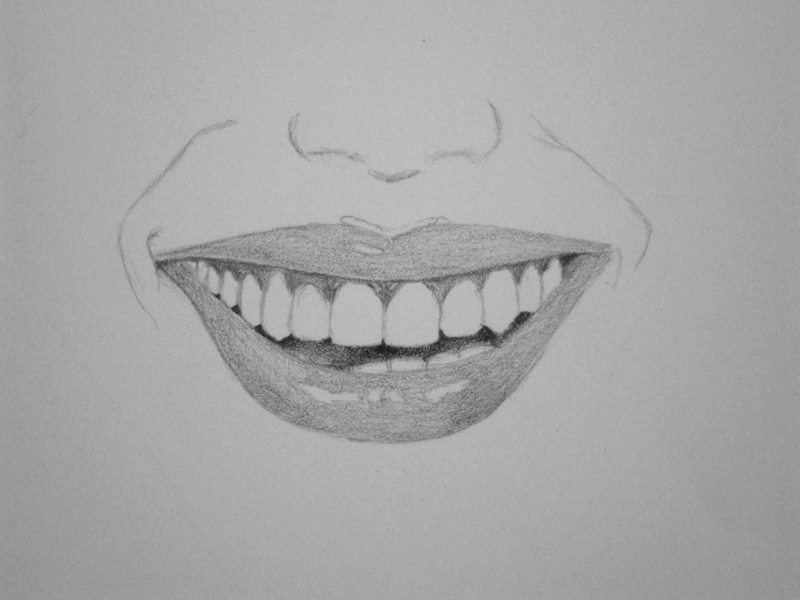
Continuing with the 2B pencil, shade in the gums lightly as shown above. Between the upper and lower rows of teeth (the area between showing the inside mouth and tongue) take the 4B pencil and add a preliminary shading as shown. Don't make the whole area dark, as there are some highlights here that will be accentuated in a later step.
With the 2B pencil sketch in the highlights on the lips, then add an even layer of shading to over the whole lips. Go lightly; we just want the general tone of the lips, later we will add the finer details.
STEP 3

Take the HB pencil, or if you prefer, a 2H pencil, as this next step is very delicate and it is necessary to apply very light graphite. We will be adding tones to the teeth.
It is assumed that teeth are white, but in reality, they are never completely white. When inside the mouth, depending on the angle and lighting, they may appear darker or lighter in tone as the case may be.
This step will really make the drawing life-like; it is tedious, but worth the effort. Using the HB (or 2H, as it is necessary to use a harder lead as we need to apply the graphite very lightly) add and even shade to all the teeth, top and bottom rows. Go very light.
When you have finished, take a tortillion (or toilet paper and twist it into a point), and gently blend each tooth one-by-one. This step may be the most difficult of this tutorial. You don't want to make the teeth too dark, but yet, you want to add the proper tone to them. If the teeth are too dark, it may indicate that your subject needs a trip to the dentist! If it happens that you add too much graphite, all is not lost. Take a kneaded eraser and light and gently remove the excess graphite. Like stated before, it requires a lot of patience!
In the image above, you can see that I have done the right side upper teeth, and the lower teeth, but the left side of the upper row of teeth have only been penciled with the HB; no blending with a tortillion yet. this is to show you both aspects (adding graphite, then blending) of this exercise.
Take care to avoid putting your hand or fingers into what you have already sketched. To obviate this, put a separate piece of scrap paper down over the drawing where you hand might go.
STEP 4

As shown above, I have finished the teeth began in the last step and have moved on to the lips and other areas. We begin to fill out the fine details in Step 4.
As you study the image above, take note of the highlighted areas; the shiny parts of the lips, as well as where the lip meets the area below the nose--along the 'bow' of the top lip, there is a highlight that follows the line of the lip. These areas receive little or no graphite as this is where the light hits directly on the subject. These highlights are important to the overall drawing, as they add realism.
Take the 4B pencil and add the darkest tones of the lips. Optionally, you can also work on the areas above the lips, and the cheeks and nose. The darkest areas are reserved for the 4B pencil; then, as the tones become lighter, use the 2B. As no part of this drawing is white, with the exception of the highlights on the lips and teeth, all areas at this point should have a layer of pencil. The highlights are the only areas which are the plain paper with no graphite applied. For the lightest areas of the skin above the lips and nose, add a thin even layer with the HB pencil.
STEP 5

Still using your finger, continue to blend the drawing, moving on to the nose and areas below the nose, and cheeks. You only need to rub lightly, the graphite blends well.
Using the final drawing above as a guide, check to see if all is well; that is, if any areas of the lips, for instance, need more shading. If so, then apply as necessary.
Taking the HB pencil, sketch slight lines over the lips (not too darkly) in an up-and-down circular motion which follows the arc of the lips. This gives the lips a life-like appearance.
Finally, accentuate the highlights with the kneaded eraser.
The drawing is completed!
Comments
Post a Comment